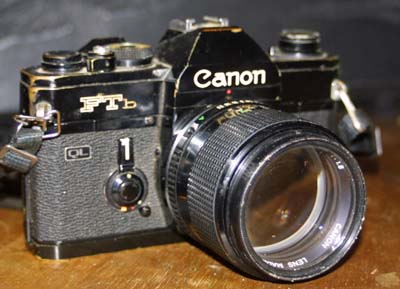
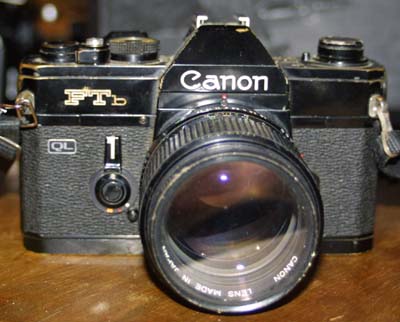
The Canon FTb![]()
|
Type | 35 MM SLR |
| Shutter Range | 1 sec - 1/1000 sec | |
| Shutter Type | Ruberized cloth, horizontal travel, mechanicly timed, focal plane | |
| Meter Type | CDS semi spot (12%) | |
| Meter Range | EV 2.5 - EV 18 | |
| Exposure System | Full aperture, manual match needle | |
| Lens Mount | Canon FD manual focus | |
| battery | 1.3 volt M20 (#625) |
The shutter of the FTb is of rubberized cloth, and is mechanically controlled through a range of speeds from 1/1000 to 1 second, plus bulb. It has a horizontal traverse curtain and a synch speed of 1/60 of a second. The shutter may be cocked, and the film advanced, by either a single long stroke, or multiple short strokes of the ratcheted winding lever. Unlike today's electronically timed shutters, the FTb shutter can be used, and will cover it's full range of speeds with the batteries dead, or removed from the camera. The batteries are used only for the meter.
The camera uses the common match needle type of manual exposure system. In this series of cameras, a look through the viewfinder shows a pair of needles on the right hand side. A plain, straight needle represents light value, and can be changed by changing the shutter speed, or the amount of illumination. A second needle has a small ring on it's end. This represents the aperture, and can be moved up and down by adjusting the size of the lens opening. The ring on the end of the aperture needle is approximately one F-stop in diameter. Getting the straight needle anywhere in the ring will give an exposure within half a stop of being right on. Towards the bottom of the right hand side, is a small rectangular reference mark. This is used for stop down metering with FD or the older FL series of lenses. The straight needle is lined up with this mark, when the lens is stopped down, to set the exposure.
In addition to exposure information, the viewfinder displays the shutter speed, and shows a small rectangle with rounded
 off corners. The rectangle shows the metered area of the prism. Canon called
this semi spot metering, and it covers, perhaps, twelve percent (a true spot
meter covers three percent or less) of the scene being photographed. This
is very good for certain types of high contrast, or oddly lit scenes. The
meter has a range, at ASA 100, of EV 2.5 to EV 18. Also in the center of
the viewfinder is the focusing aid, which consists of a microprism collar
surrounding a central split image rangefinder.
off corners. The rectangle shows the metered area of the prism. Canon called
this semi spot metering, and it covers, perhaps, twelve percent (a true spot
meter covers three percent or less) of the scene being photographed. This
is very good for certain types of high contrast, or oddly lit scenes. The
meter has a range, at ASA 100, of EV 2.5 to EV 18. Also in the center of
the viewfinder is the focusing aid, which consists of a microprism collar
surrounding a central split image rangefinder. The shutter speed dial sits on top of the camera, to the right of the pentaprism. This dial doubles as the film speed dial, through the use of a lifting collar, with a small window to display the film speed selected. The range of film speeds is pretty poor, by today's standards, going from ASA 25 to ASA2000. Next to the shutter speed dial, is the shutter release, with a locking collar. On the other side of the shutter release is the winding lever. The meter switch, as well as the rewind lever, are on the left hand side of the pentaprism. The aperture ring is on the lens itself, near the mount. On the front of the camera, to the right of the lens, is a lever which, when pushed inwards, manually stops down the lens to preview depth of field, and can lock up the mirror when pushed in all the way. This same lever, when pushed outwards, acts to set the camera's mechanical self timer. These are pretty much standard controls, all in the standard places.
The FTb, along with a few other selected models, had the Canon QL (quick load) system. The quick load system allowed users to rapidly load film, without the need to thread it on to the ratcheted spool used to pull the film through the camera. This was accomplished through the use of a pair of cogs, and a special slotted shield. the film was simply pulled across the cogs, and had the shield pulled down over it. It was then threaded onto the take up reel as it was advanced.
The auto aperture FD lenses were basically the old FL series of lenses with some mechanical improvements. The FL lenses would fit on the new FD cameras, but could only be used for stop down metering. Along with full aperture metering, the FD lenses were capable of being linked to an auto exposure system, though this feature was not supported in a camera, until the introduction of the EF. The older versions of the FD lenses had a self tightening bayonet lock. In newer versions this was modified into a quarter turn unit, with a release button. The newer version were quicker, but many photographers prefer the old style, since it can be turned to tighten if the mount loosens or wears. Both styles will attach to any FD mount camera.
The FTb was one of the few cameras in the whole F line to have a hot shoe. The F-1 had none, neither did the TLb.
 Eventually the EF would be made with one, and it was included on all A series
cameras. One interesting feature of some of the FD series cameras and lenses,
was the inclusion of the CAT (Canon auto tuning) flash system. This worked
via a ring attached to the barrel of the lens, and indexed to a nub on the
focus ring. Using a CAT flash unit, the metering system would become part
of the flash system. Focus information would be sent to the camera's meter,
and would control the movement of the shutter/meter needle. The user need
only match it to the aperture needle. This would offer, in theory, a perfect
flash exposure, with no need for fiddling with distance calculations, or
power levels. As far as I know, only the F-1, and FTb used this system. CAT
capable cameras could be recognized by a pair of extra offset, contacts on
the hot shoe. By the time the A series was released, the CAT system had become
obsolete. The newer systems used microprocessors, and sensors which read
exposure directly off of the film. There was no longer a need for an electromechanical
system.
Eventually the EF would be made with one, and it was included on all A series
cameras. One interesting feature of some of the FD series cameras and lenses,
was the inclusion of the CAT (Canon auto tuning) flash system. This worked
via a ring attached to the barrel of the lens, and indexed to a nub on the
focus ring. Using a CAT flash unit, the metering system would become part
of the flash system. Focus information would be sent to the camera's meter,
and would control the movement of the shutter/meter needle. The user need
only match it to the aperture needle. This would offer, in theory, a perfect
flash exposure, with no need for fiddling with distance calculations, or
power levels. As far as I know, only the F-1, and FTb used this system. CAT
capable cameras could be recognized by a pair of extra offset, contacts on
the hot shoe. By the time the A series was released, the CAT system had become
obsolete. The newer systems used microprocessors, and sensors which read
exposure directly off of the film. There was no longer a need for an electromechanical
system. A booster was available for the FTb, to extend the range of it's meter. This was a rather cumbersome device, but allowed
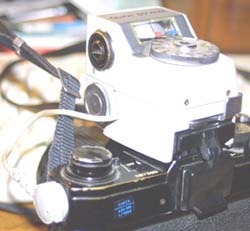 properly exposed photographs to be taken in extremely low light. The unit
fits into the hot shoe, and a shield flips down to cover the viewfinder.
It uses the camera's own built in meter, but increases the sensitivity considerably.
The battery needs to be removed from the camera, and placed in the booster
finder, in addition to the pair already carried. A two pronged cord goes from
the booster unit, and plugs into the camera's battery compartment. Exposure
information is read from a window on the booster unit. It is capable of metering
exposures of up to 30 seconds. The EV sensitivity of a booster equipped FTb
is EV -3.5 at ASA 100. This equates to 15 seconds at f 1.2.
properly exposed photographs to be taken in extremely low light. The unit
fits into the hot shoe, and a shield flips down to cover the viewfinder.
It uses the camera's own built in meter, but increases the sensitivity considerably.
The battery needs to be removed from the camera, and placed in the booster
finder, in addition to the pair already carried. A two pronged cord goes from
the booster unit, and plugs into the camera's battery compartment. Exposure
information is read from a window on the booster unit. It is capable of metering
exposures of up to 30 seconds. The EV sensitivity of a booster equipped FTb
is EV -3.5 at ASA 100. This equates to 15 seconds at f 1.2. As can be seen from the photograph, this camera is a bit the worse for wear. I bought it new, in 1974, and it has served me well. The old FTb has been bumped, dropped, bashed, and generally banged around, and has never failed me. This was also the camera on which I first began to learn photography. I am thankful that there were no auto exposure, or auto focus cameras available back then, for I would certainly have learned little or nothing from their use. The camera is so simple to use, that I often wonder why autoexposure/auto focus cameras were ever designed. The left hand cradles the camera, sets the aperture, and focus, while the right hand grasps the side, sets the shutter speed, and advances the film. After a few hours use, the camera becomes like an extension of the body. Focussing and setting exposure can be accomplished in a fraction of a second, and then the image is recorded.